Latest From My Blog

FeedBurner Overview

Table of Contents:
a.     Introduction
b.    How to setup FeedBurner feed.
c.     Benefits of using FeedBurner.
a.     Analytics.
b.    Email subscriptions.
c.     Distribute your feed on social networks (Facebook,Twitter).

    a.    Introduction

FeedBurner is a web feed management provider launched by GOOGLE in 2004 for free of service .It provides detailed analytics report for blogs, websites to determine which content is performing best, where your audience is located, and information about traffic sources such as search engines.

   b.     How to setup FeedBurner feed

STEP -1
Login into FeedBurner using Google account.
STEP – 2
Now type your website/blog URL in the burn a feed text field and click next button.
STEP – 3
Again click on next button on the new page.
STEP – 4
Enter your feed title and feed address as shown below and click next.
STEP – 5
Now your feed is live. Click on next button.
STEP – 6
On the next page you will get some options. Simply check those options which you want and press next button.
STEP – 7
Now you have completed all the steps successfully. You will receive a configuration message on your screen.

    c.    Benefits of using FeedBurner

a.    Analytics

Analytics is a very powerful pack for all the web developer to track/boost their blog/website in higher level and you can turn more subscribers using this analytics.

1.     FeedBurner is used to find out how many people are reading your feed each day,
2.     Where there are coming from, what browser they are using.
3.     Click through tracking.
4.     You can download these statistics anytime as Excel or CSV formats.

b.    Email subscriptions

This option is used to build bridge between visitors and your blog/website by sending blog/website recent updates via email for free.

      Adding email subscriptions to your blog:-


c.    Distribute your feed on social networks (Facebook,Twitter).

      Social networking is the trendy way to boost your website in online very easy manner, also it is used to take your blog/website into the next level with SEO by creating backlinks for your website/blog and it is used to connect many of your visitors to your website/blog. FeedBurner is used to distribute (Autoshare) your website/blog feed on social networking websites like Facebook and Twitter.

Auto Share Blog Post On Facebook:-

RSS graffiti is used to post your blog recent updates to Facebook. Below I have provided detailed screenshot and steps to configure your blogger feed into RSS graffiti.
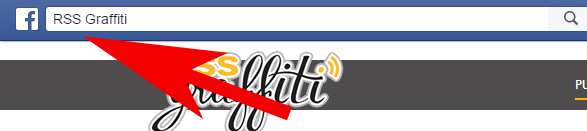
1.   Login into Facebook and search RSS graffiti shown below.
2.   You are taken to the RSS Graffiti dashboard.
3.   Click Add New Publishing Plan and name your publishing plan.

4.   A configuration area appears shown like below,
6.   Click the Add New button next to source.
7.   Add the address of your RSS feed (You can get feed URL it from feedburner dashboard shown like below) and click Add Source.
8.   Next pop-up window appears, allowing you to configure the RSS feed. I have selected the default selection of RSS Graffiti and it works well for most of time.Then choose your platform as Facebook.

9.   Click Save after you have configured your source RSS feed.
10.  Click Add New next to Target and select the page, publisher and post style and click save changes.
11.  Your publishing plan is finished, and your posts will start updating when you make a new blog post.

Auto Share Blog Post On Twitter:-

You can configure twitter auto share option with very 2 easy steps using FeedBurner. Below I have provided steps for configuring Auto share option for FeedBurner.


Hope I have covered all the points about FeedBurner. Please let me clarify if you have any doubt :-)


Google FeedBurner Overview

The following information will teach you how to generate a unique order number using PHP. Below is the PHP code snippet generating unique order number.

I have used below code in my recent eCommerce project :-)
Have a fun :-)
DOWNLOAD CODE


Generate Order Number Using PHP

PHP curl with proxy:

The following information will teach you how to use curl function behind a proxy. Below is the simple PHP code snippet requesting given URL using curl and HTTP proxy server.

$loginpassw = 'login:password';  //your proxy login and password here
$proxy_ip = '127.0.0.1'; //proxy IP here
$proxy_port = 8080; //proxy port from your proxy list
$url = 'http://example.com'; //URL to get

$ch = curl_init();
curl_setopt($ch, CURLOPT_URL, $url);
curl_setopt($ch, CURLOPT_HEADER, 0); // no headers in the output
curl_setopt($ch, CURLOPT_RETURNTRANSFER, 1); // output to variable
curl_setopt($ch, CURLOPT_PROXYPORT, $proxy_port);
curl_setopt($ch, CURLOPT_PROXYTYPE, 'HTTP');
curl_setopt($ch, CURLOPT_PROXY, $proxy_ip);
curl_setopt($ch, CURLOPT_PROXYUSERPWD, $loginpassw);
$data = curl_exec($ch);
curl_close($ch);

PHP curl with proxy

How to set the http_proxy Variable in Windows7/Windows8

The following information will teach you how to allow Windows7/Windows8 system to use a proxy server to download some external packages/plugins using command line.
Example: I have used this option to update composer and install packages in my recent laravel project.

Steps to set the http and https proxy variable

1.     Open the command prompt.
2.     Paste following http_proxy  and https_proxy command in cmd
set HTTP_PROXY=http://{{USERNAME}}:{{PASSWORD}}@{{PROXY_URL}}:{{PROT_NUMBER}} 
set HTTPS_PROXY=http://{{USERNAME}}:{{PASSWORD}}@{{PROXY_URL}}:{{PROT_NUMBER}}
{{USERNAME}}  -  Proxy Username.
{{PASSWORD}} – Proxy Password.
{{PROXY_URL}} – Proxy Url.
{{PORT_NUMBER}} – Proxy Port Number.
Now your system ready to download resource (packages/plugins) from the internet using command line.

How to set the http_proxy Variable in Windows7/Windows8

How to Import/Export a MySQL Database
MySQL command is used to export large database in easiest and fastest way. This example shows you how to export/import a database. It is good to export your data often as a backup.
Export a MySQL Database
      1.     If you are on Windows you will need to open CMD and go to directory where mysql.exe is installed. If you are using WAMP server then this will be usually located in:
C:\wamp\bin\mysql\mysql5.6.17\bin (*note the version of mysql might be different) and then SHIFT+RIGHT CLICK and click on the Open Command Window Here from specified path.


2.     After the first step execute the below command in command prompt.
                   mysqldump -u {DB-USER-NAME} -h {MySQL-SERVER-HOST-NAME} -p {DB-NAME} > {NAME-OF-THE-FILE.sql path}
      3.     You will be promoted for a password, type the password for the respective username and press Enter. Replace the username, password and database_name with your MySQL username, password and database name.

4.     The file test.sql now holds a backup of your database and is ready for download in your computer.
5.     To export a single table from your database you can use the following command:
                 mysqldump -p --user={DB-USER-NAME} {DB-NAME} {TABLE_NAME} > tableName.sql
6.     Again you would need to replace the username, database and tablename with the correct information. Once it is done the table specified would be saved to your computer as tableName.sql.
      Import a MySQL Database
      1.     Locate.Sql file in following specified directory C:\wamp\bin\mysql\mysql5.6.17\bin.

2.     If you are on Windows you will need to open CMD and go to directory where mysql.exe is installed. If you are using WAMP server then this will be usually located in:
C:\wamp\bin\mysql\mysql5.6.17\bin (*note the version of mysql might be different)     and then SHIFT+RIGHT CLICK and click on the Open Command Window Here from specified path. Refer above screen shot.
3.     Next run the command in command prompt:
     mysql -u {DB-USER-NAME} -h {MySQL-SERVER-HOST-NAME} -p {DB-NAME} < {db.file.sql path}
      4.     To import a single table into an existing database you would use the following command
                mysql -p --user={DB-USER-NAME} {DB-NAME} {TABLE_NAME} > tableName.sql

How to Import/Export a MySQL Database using MySql command line

How to submit your blog or website in Bing webmaster tool
Today (30-NOV-2014) we are going to see about Bing webmaster tool. 
Submitting our blog or website in various search engines in very important in SEO. Today we are going to see about famous search engine Bing. Bing Webmaster tool playing important role in SEO (Search Engine Optimization).  It is used to index your website (that means add your website) into Bing search directory.
Below I have provided the steps to add your blog into google webmaster tool.
STEP – 1
Login in to your Bing account (https://www.bing.com/webmaster/).
STEP - 2                              
Go to Add Site in left sidebar
1.     Enter your website or blog URL in first textbox.
2.     Enter your sitemap.xml URL in second textbox.
3.     And then click on ADD button
Below I just provided the atom.xml for bloggers
http://www.yourblogname.in/atom.xml?redirect=false&start-index=1&max-results=500
STEP - 3
After that you need to verify your website or blog ownership,
  1. Copy the META URL and then past it inside your <head> tag.
  2. After that confirm your ownership.


Hope your blog or Website added successfully in the famous search engine Bing. Pls comment, if you have any doubt.

3 easy steps to submit your blog or website in Bing webmaster tool


Submit Sitemap in google webmaster tool
(30-Nov-2014) Sitemap is like book index page we can identify the topic covered in the book and where the topic is placed in book using the page number. Similarly search engine need XML sitemap file of your website or blog to discover pages from your site based on search users bots.
The XML sitemap file is like a directory of all web pages that exist on your website or blog. Search engines like Google and Bing can use these sitemap files to discover pages on your site that the search bots may have otherwise missed during regular crawling.
STEP -1
Login to google webmaster tool.( https://www.google.co.in/webmasters/)
STEP – 2
Click on the site which is listing in your dashboard.

Go to the Crawl->Sitemap submit your website
Here I have provided for blogger platform. So you just add your atom.xml file
http://www.yourblogname.in/atom.xml?redirect=false&start-index=1&max-results=500


Hope you have added SITEMAP in google successfully.If you have any doubt pls comment below

2 easy steps to submit sitemap in google webmaster tool

+